The End of Phishing: Passkeys Make Lookalike Sites Useless
I got a phishing email last month that genuinely made me pause. The sender, the branding, the tone, all convincing enough that I hovered over the link for a second before checking the actual domain. That second of doubt is exactly what attackers are buying when they clone a login page. And it reminded me why I've been pushing passkeys in every architecture review I've been part of this year: the goal should be making the fake site technically useless.
Traditional authentication, even with MFA, remains fundamentally vulnerable to phishing. SMS codes can be intercepted. TOTP codes can be proxied in real-time. Even push notifications can be social-engineered through MFA fatigue attacks. Every defense we've built assumes the user can distinguish legitimate from malicious, and attackers have become extraordinarily good at exploiting that assumption. When phishing accounts for around 16% of all data breaches according to the 2025 Verizon DBIR, and credential abuse drives another 22%, we're not dealing with edge cases. We're dealing with a structural failure in how authentication works.
The Password Problem Runs Deeper Than We Admit
The security industry has spent decades trying to patch passwords. We added complexity requirements (which users hate), rotation policies (which security experts now recommend against), and layer after layer of second factors. Each addition made the system more complex, more expensive to maintain, and often more vulnerable to new attack vectors. The fundamental problem remains: passwords are shared secrets that travel across the network. If an attacker can convince a user to type that secret into the wrong place, the game is over.
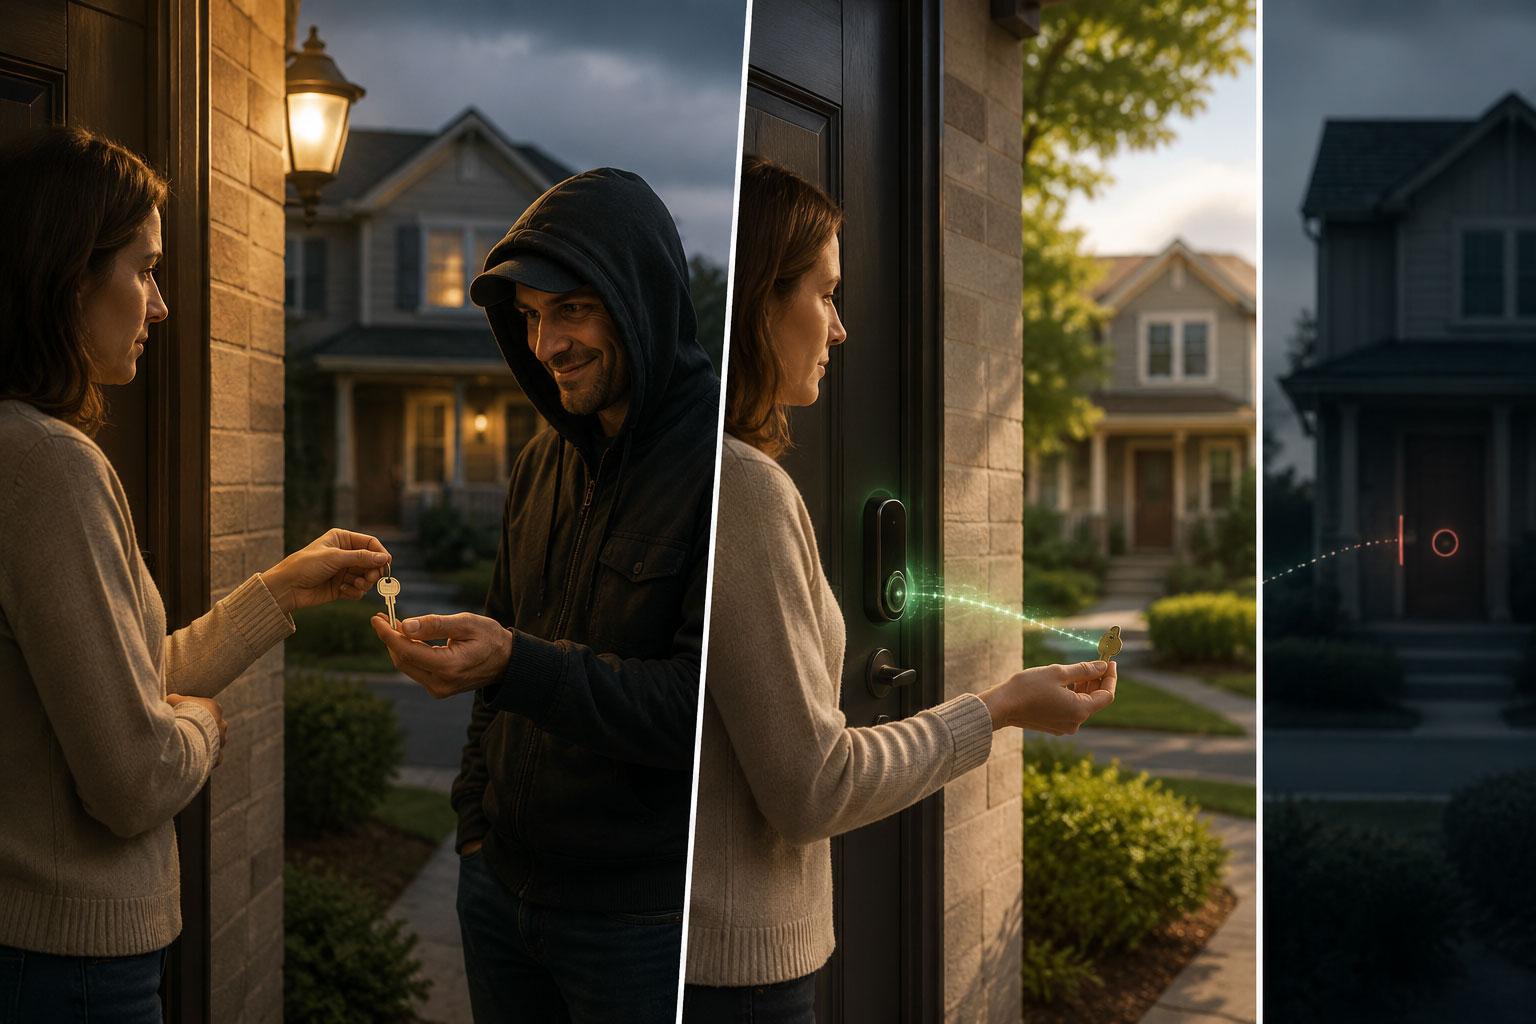
Passkeys represent a different approach entirely. Think of traditional password authentication as handing someone your house key so they can verify you own the house. You're trusting them not to make a copy, not to lose it, and that the person asking is actually your neighbor and not someone wearing a convincing disguise. Passkeys work more like a cryptographic handshake at your front door: you prove you have the key without ever letting it leave your possession, and the door itself is encoded with your address, so a lookalike door on a different street simply won't respond.
What Makes Passkeys Structurally Different
Passkeys leverage asymmetric public-key cryptography in a way that fundamentally changes the authentication model. When you register a passkey with a service, your device generates a unique key pair: a private key that never leaves your device and a public key that the service stores. The private key lives in a hardware-backed secure enclave, the same tamper-resistant chip that protects your biometric data, and can only be used after you authenticate locally with Face ID, Touch ID, Windows Hello, or a PIN.
Here's what makes this architecture phishing-resistant by design:
| Traditional MFA | Passkey Authentication |
|---|---|
| Shared secret (password) sent to server | Private key never leaves device |
| Second factor (OTP) sent to server | Cryptographic challenge-response |
| Works with any site that asks | Origin-bound to specific domain |
| User must verify legitimacy | Browser verifies legitimacy cryptographically |
| Phishing proxy can capture and replay | Lookalike site receives nothing usable |
The origin-binding is the critical piece. Each passkey credential is cryptographically tied to the exact domain of the relying party. When you attempt to sign in, the browser provides the origin to the authenticator. If you're on bank.com, the passkey for bank.com works. If you're on bank-secure-login.com (a phishing site), the passkey simply won't activate. There's no user decision to make, no URL to carefully inspect. The cryptography enforces the boundary.
This isn't theoretical. Google reports 800 million accounts using passkeys with over 2.5 billion sign-ins, a 30% improvement in sign-in success rates, and sign-ins that are around 20% faster on average. Amazon reports sign-ins six times faster than traditional username-and-password flows, with over 456 million customers enrolled. The FIDO Alliance Passkey Index, published in October 2025, counts over 15 billion eligible accounts globally and reports a 93% passkey sign-in success rate compared to 63% for other methods. The technology has moved from promising to proven.
The Regulatory Landscape Has Caught Up
NIST SP 800-63-4, finalized on July 31, 2025, now classifies synced passkeys as AAL2-compliant, resolving earlier uncertainty around cloud-synced credentials. This matters because AAL2 is the authenticator assurance level required for most sensitive operations in government and regulated industries. (Device-bound hardware keys remain required for AAL3.) The regulatory pressure is real and accelerating: the UAE Central Bank issued a directive in June 2025 requiring all financial institutions to eliminate SMS and email OTPs by March 2026. The Reserve Bank of India published similar rules in September 2025 requiring multi-factor authentication with at least one dynamic factor for every digital payment, effective April 2026. In the US, the Patent and Trademark Office dropped SMS authentication in May 2025, FINRA followed in July, and both the FBI and CISA have formally recommended against SMS-based MFA. The market pressure is no longer just about user experience or security best practices. It's becoming a compliance requirement.
The FIDO Alliance's Credential Exchange Format (CXF) was published as a recommended standard in August 2025, defining a portable JSON format for passkeys, passwords, and TOTP secrets. The accompanying Credential Exchange Protocol (CXP), which handles the cryptographically protected transfer between credential managers, is currently a working draft targeting standardisation in early 2026. In the interim, Apple's iOS 26 (released September 2025) already supports local on-device migration using CXF, with Bitwarden among the first managers to implement it. Full cross-platform and cross-provider portability moving freely between iCloud Keychain, 1Password, Google Password Manager, and corporate identity providers is coming, but not universally available yet. The direction is clear, and the vendor lock-in concern that made early adopters nervous has a credible answer.
Rolling Out Passkeys Without Breaking Everything
Implementation has evolved from a multi-month integration project to something achievable in two sprints. Major identity providers including Auth0, Okta, and Azure AD now support passkeys as a first-class feature with SDKs and libraries that handle the cryptographic complexity. Here's how to approach the rollout:
Before You Touch Production: Run It Locally First
Before integrating passkeys into your real stack, spend 20 minutes with a self-contained local demo. Browsers allow WebAuthn on localhost without HTTPS, so your workstation is sufficient. No ngrok, no certificates, no staging environment needed.
The fastest path to a working local demo uses the @simplewebauthn libraries, which handle all the cryptographic heavy lifting and work in Node.js on Windows, macOS, and Linux.
Prerequisites: Node.js 18 or later. That's it.
mkdir passkey-demo && cd passkey-demo
npm init -y
npm install @simplewebauthn/server @simplewebauthn/browser express
Create server.mjs:
import express from 'express';
import {
  generateRegistrationOptions,
  verifyRegistrationResponse,
  generateAuthenticationOptions,
  verifyAuthenticationResponse,
} from '@simplewebauthn/server';

const app = express();
app.use(express.json());
app.use(express.static('public'));

// Serve the browser library directly from node_modules — no CDN, no CORS issues
app.get('/simplewebauthn-browser.js', (req, res) => {
  res.sendFile('node_modules/@simplewebauthn/browser/dist/bundle/index.umd.min.js', { root: process.cwd() });
});

const RP_ID = 'localhost';
const RP_NAME = 'Passkey Demo';
const ORIGIN = 'http://localhost:3000';

// In-memory store — good enough for local testing
const users = {};
const challenges = {};

app.get('/api/register/options', async (req, res) => {
  const userId = 'demo-user';
  const options = await generateRegistrationOptions({
    rpName: RP_NAME,
    rpID: RP_ID,
    userID: new TextEncoder().encode(userId),
    userName: 'demo@example.com',
    authenticatorSelection: {
      residentKey: 'required',
      userVerification: 'required',
    },
  });
  challenges[userId] = options.challenge;
  res.json(options);
});

app.post('/api/register/verify', async (req, res) => {
  const userId = 'demo-user';
  const verification = await verifyRegistrationResponse({
    response: req.body,
    expectedChallenge: challenges[userId],
    expectedOrigin: ORIGIN,
    expectedRPID: RP_ID,
  });
  if (verification.verified) {
    users[userId] = verification.registrationInfo;
    res.json({ verified: true });
  } else {
    res.status(400).json({ verified: false });
  }
});

app.get('/api/auth/options', async (req, res) => {
  const userId = 'demo-user';
  const credential = users[userId];
  const options = await generateAuthenticationOptions({
    rpID: RP_ID,
    allowCredentials: credential
      ? [{ id: credential.credential.id, type: 'public-key' }]
      : [],
    userVerification: 'required',
  });
  challenges[userId] = options.challenge;
  res.json(options);
});

app.post('/api/auth/verify', async (req, res) => {
  const userId = 'demo-user';
  const credential = users[userId];
  const verification = await verifyAuthenticationResponse({
    response: req.body,
    expectedChallenge: challenges[userId],
    expectedOrigin: ORIGIN,
    expectedRPID: RP_ID,
    credential: credential.credential,
  });
  res.json({ verified: verification.verified });
});

app.listen(3000, () => console.log('Passkey demo running on http://localhost:3000'));
Create public/index.html:
<!DOCTYPE html>
<html>
<head><title>Passkey Demo</title></head>
<body>
  <h1>Passkey Demo</h1>
  <button onclick="register()">Register passkey</button>
  <button onclick="authenticate()">Sign in with passkey</button>
  <pre id="log"></pre>

  <script src="/simplewebauthn-browser.js"></script>
  <script>
    const { startRegistration, startAuthentication } = SimpleWebAuthnBrowser;

    window.register = async () => {
      const options = await fetch('/api/register/options').then(r => r.json());
      const credential = await startRegistration({ optionsJSON: options });
      const result = await fetch('/api/register/verify', {
        method: 'POST',
        headers: { 'Content-Type': 'application/json' },
        body: JSON.stringify(credential),
      }).then(r => r.json());
      document.getElementById('log').textContent = JSON.stringify(result, null, 2);
    };

    window.authenticate = async () => {
      const options = await fetch('/api/auth/options').then(r => r.json());
      const credential = await startAuthentication({ optionsJSON: options });
      const result = await fetch('/api/auth/verify', {
        method: 'POST',
        headers: { 'Content-Type': 'application/json' },
        body: JSON.stringify(credential),
      }).then(r => r.json());
      document.getElementById('log').textContent = JSON.stringify(result, null, 2);
    };
  </script>
</body>
</html>
node server.mjs
Open http://localhost:3000 in Chrome, Edge, or Firefox. Click "Register passkey". Your OS will prompt for Face ID, Windows Hello, or your device PIN. Click "Sign in with passkey" and you'll see { "verified": true } without typing a single password.
What this proves locally:
- The private key never leaves your device. All the server ever sees is a signed challenge
- The
rpIDis hardcoded tolocalhost, so if you open the same page on a different port (saylocalhost:4000) and try to authenticate, the browser refuses - If you serve the same HTML from a second server on a different domain and attempt to authenticate, the passkey simply does not appear
That second point is exactly the origin-binding property that makes phishing structurally impossible. You've just demonstrated it on your own machine in under 20 minutes.
When you move to production, swap RP_ID and ORIGIN for your real domain, replace the in-memory users and challenges stores with your database and Redis, and the rest of the logic stays the same. The production C# implementation below follows the same pattern. Options out, signed response in, verify server-side:
1. Verify progressive enhancement: passkey alongside a PIN fallback
The goal is to confirm that a user who declines the passkey prompt can still complete a traditional login, and that a user who registers a passkey can use it on the next visit. Add a hashed-PIN path to the demo alongside the existing passkey flow.
Add to server.mjs:
import crypto from 'crypto';
const pins = {};

app.post('/api/pin/register', (req, res) => {
  const { pin } = req.body;
  pins['demo-user'] = crypto.createHash('sha256').update(pin).digest('hex');
  res.json({ ok: true });
});

app.post('/api/pin/login', (req, res) => {
  const { pin } = req.body;
  const hashed = crypto.createHash('sha256').update(pin).digest('hex');
  res.json({ verified: pins['demo-user'] === hashed });
});
Add to index.html:
<hr>
<h2>PIN fallback</h2>
<input id="pin" type="text" placeholder="choose a short PIN">
<button onclick="pinRegister()">Register with PIN</button>
<button onclick="pinLogin()">Sign in with PIN</button>
And the JS:
window.pinRegister = async () => {
  const result = await fetch('/api/pin/register', {
    method: 'POST',
    headers: { 'Content-Type': 'application/json' },
    body: JSON.stringify({ pin: document.getElementById('pin').value }),
  }).then(r => r.json());
  document.getElementById('log').textContent = JSON.stringify(result, null, 2);
};

window.pinLogin = async () => {
  const result = await fetch('/api/pin/login', {
    method: 'POST',
    headers: { 'Content-Type': 'application/json' },
    body: JSON.stringify({ pin: document.getElementById('pin').value }),
  }).then(r => r.json());
  document.getElementById('log').textContent = JSON.stringify(result, null, 2);
};
What to observe: Both paths work independently. A user who registers a PIN and uses the PIN login never touches WebAuthn. A user who registers a passkey authenticates without the PIN field. This is progressive enhancement: new users get the better default, existing users are not broken. In production your registration controller emits passkey options as the primary path and offers the legacy method as a fallback, using exactly this two-path pattern.
2. Verify account recovery does not reintroduce a phishable fallback
This is the step most implementations get wrong. If recovery falls back to an email link or SMS code, the phishing resistance you just built has a backdoor. Add a recovery code path to the demo so you can see the correct pattern in isolation.
Add to server.mjs:
const recoveryCodes = {};

app.get('/api/recovery/generate', (req, res) => {
  const plain = Array.from({ length: 8 }, () =>
    crypto.randomBytes(6).toString('hex').toUpperCase().match(/.{4}/g).join('-')
  );
  recoveryCodes['demo-user'] = plain.map(c =>
    crypto.createHash('sha256').update(c).digest('hex')
  );
  res.json({ codes: plain });
});

app.post('/api/recovery/redeem', (req, res) => {
  const { code } = req.body;
  const hashed = crypto.createHash('sha256').update(code.trim()).digest('hex');
  const stored = recoveryCodes['demo-user'] ?? [];
  const idx = stored.indexOf(hashed);
  if (idx === -1) return res.status(400).json({ verified: false });
  stored.splice(idx, 1);
  res.json({ verified: true });
});
Add to index.html:
<hr>
<h2>Recovery codes</h2>
<button onclick="generateCodes()">Generate recovery codes</button>
<input id="rc" type="text" placeholder="paste a code to redeem">
<button onclick="redeemCode()">Redeem code</button>
And the JS:
window.generateCodes = async () => {
  const result = await fetch('/api/recovery/generate').then(r => r.json());
  document.getElementById('log').textContent =
    'Save these - they will not be shown again:\n\n' + result.codes.join('\n');
};

window.redeemCode = async () => {
  const result = await fetch('/api/recovery/redeem', {
    method: 'POST',
    headers: { 'Content-Type': 'application/json' },
    body: JSON.stringify({ code: document.getElementById('rc').value }),
  }).then(r => r.json());
  document.getElementById('log').textContent = JSON.stringify(result, null, 2);
};
What to observe: Generate the codes and copy one. Paste it into the redeem field { "verified": true }. Paste the same code again { "verified": false }. The code is gone. This is the pattern: recovery goes through a secret the user stored at enrollment time, checked server-side against a hash. No email, no SMS, nothing phishable.
3. Observe authentication metrics in the server log
In production, metrics go to Prometheus or Datadog. For the demo, instrument server.mjs so you can see the same data points in the terminal. Replace the /api/auth/verify handler with:
app.post('/api/auth/verify', async (req, res) => {
  const start = Date.now();
  const userId = 'demo-user';
  const credential = users[userId];
  const verification = await verifyAuthenticationResponse({
    response: req.body,
    expectedChallenge: challenges[userId],
    expectedOrigin: ORIGIN,
    expectedRPID: RP_ID,
    credential: credential.credential,
  });
  console.log(JSON.stringify({
    event: 'auth_attempt',
    method: 'passkey',
    verified: verification.verified,
    duration_ms: Date.now() - start,
    ts: new Date().toISOString(),
  }));
  res.json({ verified: verification.verified });
});
What to observe: Each sign-in logs a structured line to the terminal. In production you emit the same fields to your metrics pipeline and track success rate, p95 latency, and fallback frequency per device type. The shape is identical, only the destination changes.
4. Compare platform vs. cross-platform authenticators in the browser dialog
You do not need a hardware key to understand this distinction. The browser dialog itself shows you which type is being used.
In server.mjs, try changing authenticatorSelection and observe the difference:
// Option A: platform only (Windows Hello, Touch ID, Android biometric)
authenticatorSelection: { authenticatorAttachment: 'platform', residentKey: 'required', userVerification: 'required' }

// Option B: cross-platform only (hardware key or phone-as-authenticator via QR)
authenticatorSelection: { authenticatorAttachment: 'cross-platform', residentKey: 'required', userVerification: 'required' }

// Option C: user's choice (recommended default, omit the field)
authenticatorSelection: { residentKey: 'required', userVerification: 'required' }
Restart the server with option A: the browser only shows Windows Hello or Touch ID, not a hardware key or QR option. Switch to option B: the browser only shows the hardware key or phone option. Option C lets the user choose.
For most users, use option C. For admin or privileged access, require option B with a hardware security key so the credential is physically device-bound and cannot be synced or exported.
5. Test the phishing resistance yourself
Add two entries to your hosts file so you have two different-looking domains pointing at the same server.
On Windows, open Notepad as administrator and edit C:\Windows\System32\drivers\etc\hosts. On macOS/Linux, use sudo nano /etc/hosts:
127.0.0.1  bank-demo.local
127.0.0.1  bank-dem0.local
Update the constants at the top of server.mjs to match:
const RP_ID = 'bank-demo.local';
const ORIGIN = 'http://bank-demo.local:3000';
Restart the server. Open http://bank-demo.local:3000 and register a passkey. Now open http://bank-dem0.local:3000 (zero instead of o) in the same browser and click Sign in. The passkey does not appear. The browser does not even prompt.
Try these variations:
- Typosquatting (
bank-demo.localvs.bank-dem0.local): passkey absent - Subdomain mismatch (
login.bank-demo.localvs.bank-demo.local): passkey absent unless you explicitly setrpIDto the parent domain to allow it - Wrong scheme: register on
http://, attempt onhttps://(or vice versa): passkey absent
In every case the passkey does not activate. There is no credential to steal, no code to intercept, no session to hijack. You have verified this on your own machine before writing a single line of production code.
The Uncomfortable Questions We Need to Answer
Passkeys represent the most significant shift in authentication since we moved from passwords to password-plus-something-else. The technology is mature, the ecosystem support is comprehensive, and the security benefits are structural rather than incremental. Here's what successful adoption looks like:
- Start with new user registrations to build passkey adoption without disrupting existing users
- Design recovery flows that don't reintroduce phishing vulnerabilities through SMS or email fallbacks
- Monitor adoption metrics and authentication success rates to identify friction points
- Reserve device-bound credentials for privileged access while using synced passkeys for general authentication
The questions your team should be discussing:
- If we're building a new authentication system today, what justification exists for not making passkeys the default?
- For existing systems, what's the migration path that minimizes user disruption while maximizing security improvement?
- How do we handle the small percentage of users on older devices or browsers that don't support passkeys without creating a phishable backdoor?
- What does our incident response plan look like when phishing attacks against our authentication system become structurally impossible?
That last question might seem premature, but it's worth considering. When phishing stops working, attackers adapt. They'll target account recovery flows, social engineering of support staff, malware on user devices, or vulnerabilities in adjacent systems. Passkeys solve the authentication phishing problem comprehensively. Make sure you're thinking about where the pressure moves next.
Share this article
Related articles

Sandboxed Agents: Giving Your Code Monkeys Their Own Sandbox
Coding agents that can delete your work, mine cryptocurrency, and exfiltrate data are not hypothetical. This post covers how sandboxed execution works, which isolation technologies to choose for your threat model, and how to build a working Docker-based sandbox from scratch.

Spec-Driven Development: Let AI Read the Boring Stuff For You
Most teams consult specifications when things break. Spec-driven development turns that around, making the spec the source of truth before a single line of code is written. This post covers the four pillars of SDD, a step-by-step Claude Code walkthrough using FHIR validation, the current tooling landscape, and an honest look at where the practice still falls short.

DORA Metrics for Architects: Stop Guessing, Start Measuring
DORA metrics give architects objective feedback on whether their decisions are helping or hurting. Learn how to use all five metrics, including the 2025 addition of Rework Rate, to measure delivery performance, identify bottlenecks, and make the case for architectural change with data.
Enjoyed this article?
Subscribe to get more insights delivered to your inbox monthly
Subscribe to Newsletter